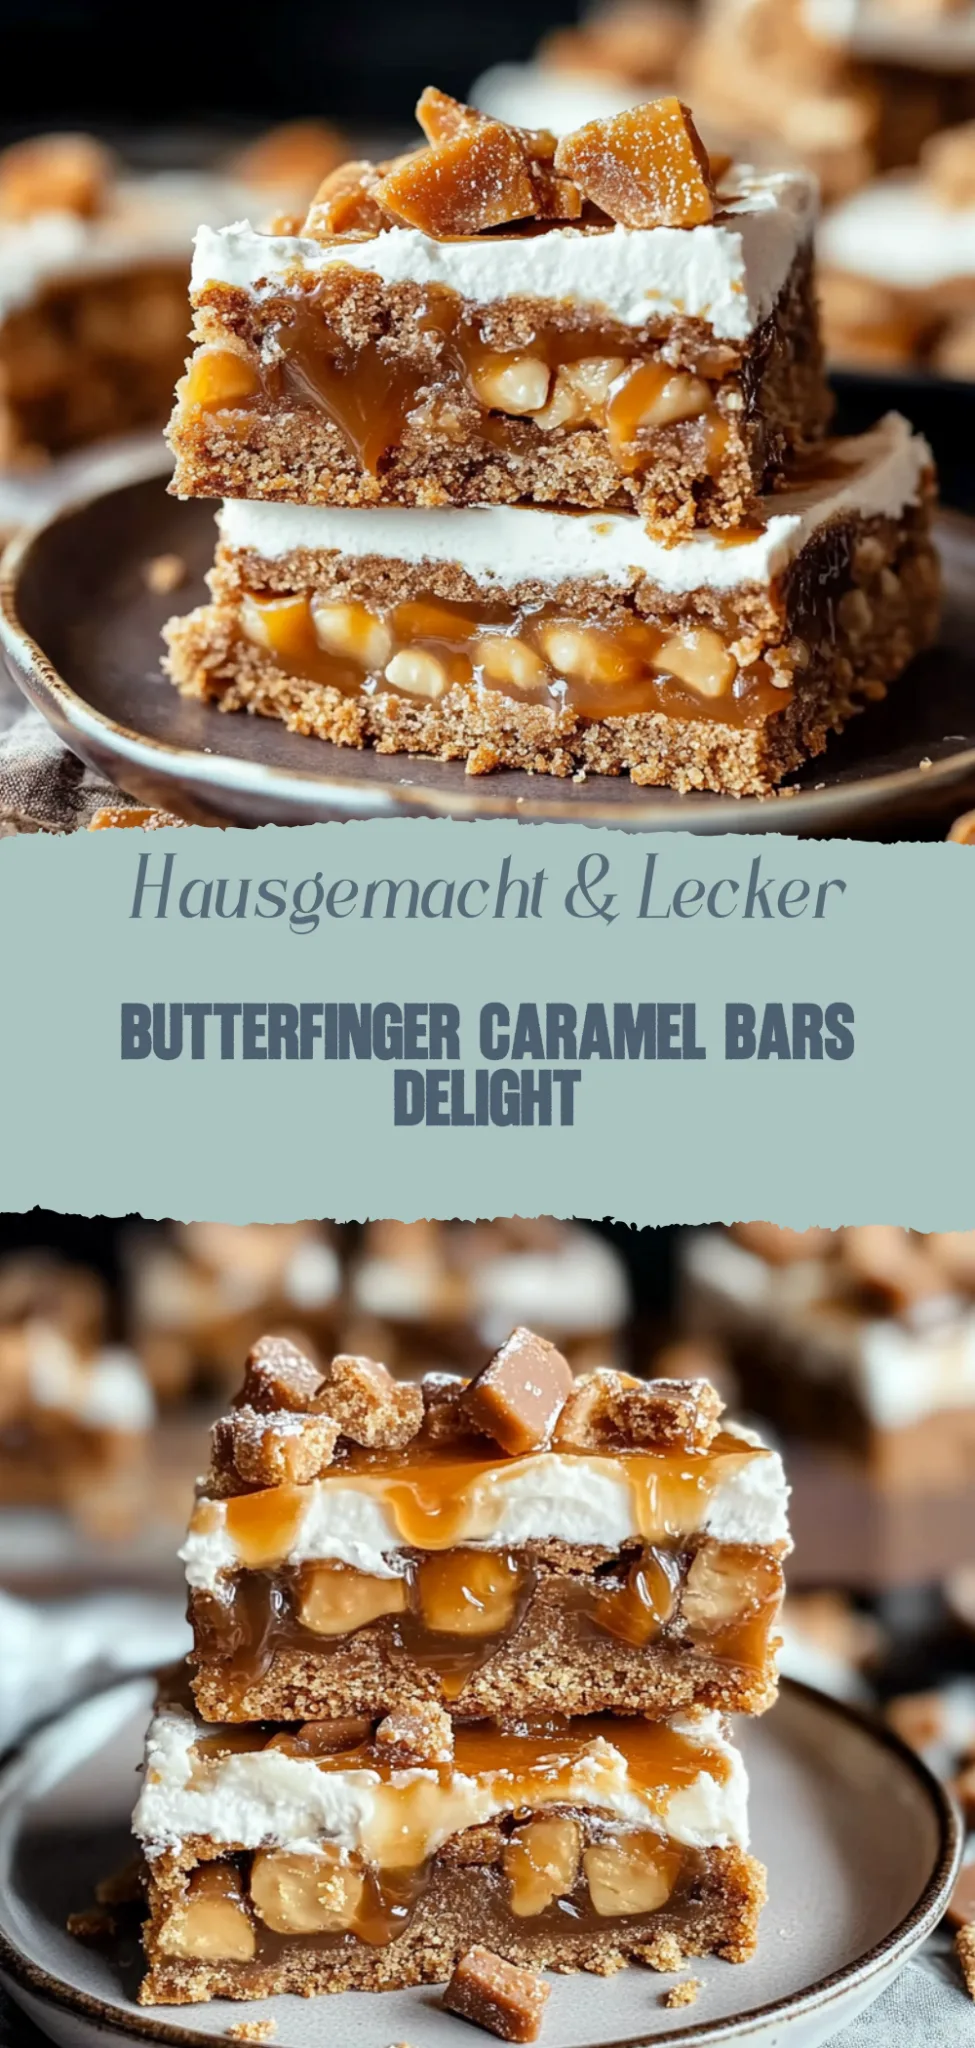
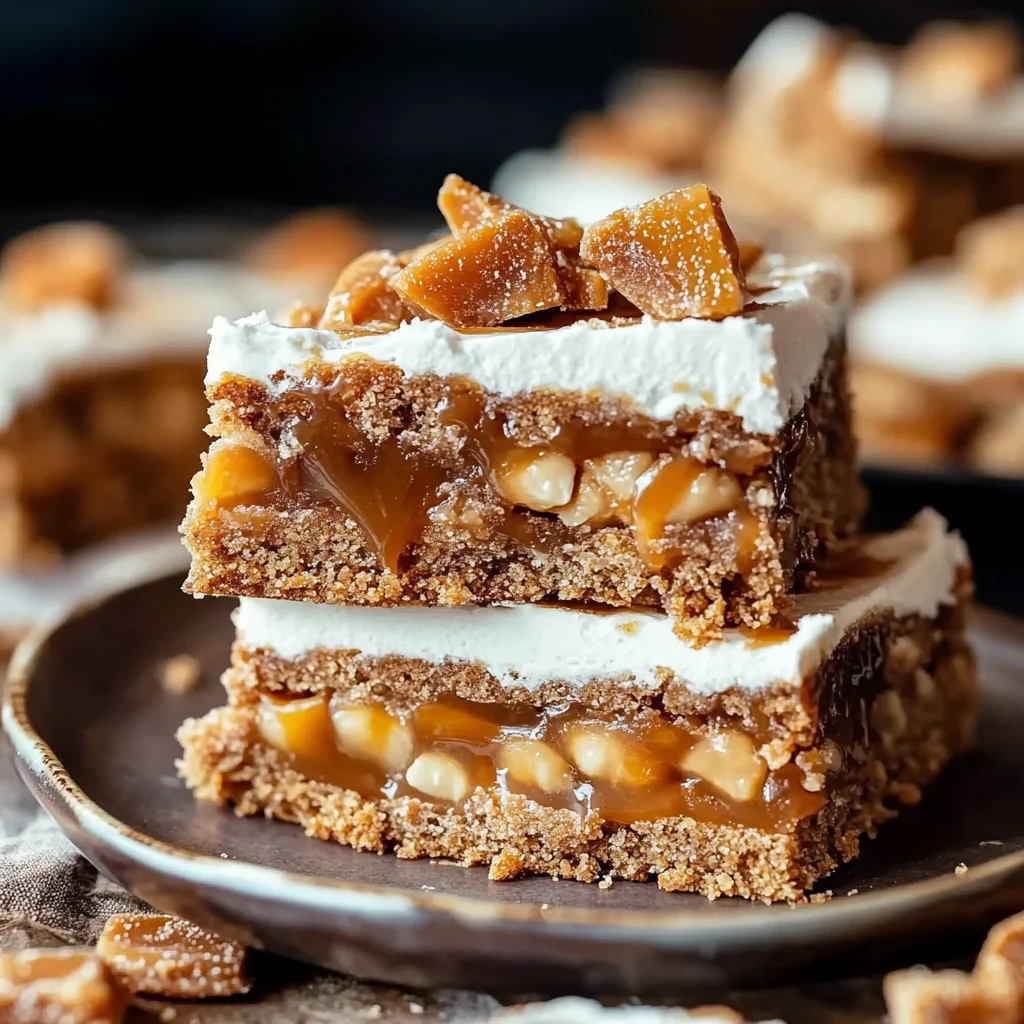
Butterfinger Caramel Bars: A Gooey Dream Come True
Imagine sinking your teeth into a warm, gooey slice of chocolate cake, where each bite melts in your mouth like a sweet dream come true. The rich aroma wafting through the air instantly transports you to a cozy café, where laughter mingles with the clinking of forks against plates, all while the enchanting flavors dance on your palate—this is not just dessert; it’s an experience.
As I recall my grandmother’s kitchen filled with flour clouds and sugary whispers, I can’t help but smile. The best moments often revolved around her famous cake, making every birthday and family gathering feel like a celebration of love. So whether you’re whipping this up for a special occasion or simply to indulge on a Tuesday evening, prepare yourself for an unforgettable flavor journey that will leave you craving more.
Why are Butterfinger Caramel Bars a must-try?
Irresistible flavor combines creamy caramel and crunchy Butterfinger bits in every bite!
Quick to make, these bars require minimal prep time, so you can enjoy them sooner.
Versatile enough for any occasion—dessert table, potluck, or just because!
Crowd-pleasing treats that will have everyone asking for seconds (or thirds!).
Unique twist on traditional bars that will delight both kids and adults alike!
Butterfinger Caramel Bars Ingredients
For the Base:
- 1 1/2 cups graham cracker crumbs – Provides a sweet, crunchy foundation; consider using gluten-free crackers for a GF option.
- 1/2 cup unsalted butter (melted) – Binds the crumbs together and adds richness; coconut oil can be used for a dairy-free alternative.
- 1/4 cup granulated sugar – Sweetens the base; you can reduce this if you prefer a less sweet crust.
For the Caramel Layer:
- 14 oz sweetened condensed milk – Creates a creamy texture; evaporated milk can be a substitute but will change the consistency slightly.
- 1 cup caramel sauce – Store-bought or homemade works well here; feel free to use chocolate caramel for a twist.
For the Topping:
- 2 cups Butterfinger candy bars (chopped) – The star of the show, adding crunch and flavor; any chocolate bar can be substituted if needed.
- 1 cup semi-sweet chocolate chips – Melts beautifully over the bars; dark chocolate is an excellent option for a richer taste.
- 1 tablespoon vegetable oil – Helps to thin out the chocolate for easy drizzling; can use coconut oil for added flavor.
How to Make Butterfinger Caramel Bars
1. Prepare the Pan: Begin by greasing a 9×13 inch baking dish with butter or line it with parchment paper for easy removal later. This will keep your bars from sticking!
2. Mix the Base: In a large bowl, combine crushed graham crackers, melted butter, and sugar until well blended. The mixture should be crumbly yet moist—this will form the delicious base.
3. Press the Crust: Firmly press the graham cracker mixture into the bottom of your prepared pan. Aim for an even layer that’s about 1/4 inch thick, creating a solid foundation for your bars.
4. Bake the Crust: Place the crust in a preheated oven at 350°F for 10 minutes, or until it’s lightly golden. Let it cool slightly while you prepare the caramel layer.
5. Make the Caramel: In a saucepan over medium heat, melt together sweetened condensed milk and caramels, stirring constantly until smooth and creamy—about 5-7 minutes.
6. Pour Caramel onto Crust: Gently pour the warm caramel mixture over your baked crust, spreading it evenly with a spatula. It should look luscious and inviting!
7. Add Butterfinger Topping: Sprinkle chopped Butterfinger candies generously on top of the caramel layer. Press them down lightly to ensure they stick during baking.
8. Final Bake: Return the pan to the oven and bake for another 15 minutes at 350°F, allowing everything to meld together beautifully. The edges should be bubbly and golden.
9. Cool & Slice: Remove from the oven and let cool completely in the pan before slicing into squares or bars. Patience here pays off as it helps set those delicious layers!
Optional: Drizzle melted chocolate on top for an extra indulgent touch.
Exact quantities are listed in the recipe card below.
Tips for the Best Butterfinger Caramel Bars
- Choose Fresh Ingredients: Use fresh butter and high-quality chocolate for rich flavor. Stale ingredients can lead to disappointing results.
- Perfectly Layered: When layering the Butterfinger caramel bars, ensure even distribution to avoid uneven bites. A spatula helps with smooth spreading.
- Cool Completely: Allow the bars to cool completely before cutting. This prevents a messy slice and keeps layers intact for that perfect presentation.
- Watch Your Oven: Baking times can vary; keep an eye on the bars towards the end of baking to avoid overcooking or burning.
- Storage Savvy: Store your Butterfinger caramel bars in an airtight container at room temperature for up to a week. Refrigeration can alter their texture.
How to Store and Freeze Butterfinger Caramel Bars
- Room Temperature: Keep your Butterfinger Caramel Bars in an airtight container for up to 3 days. This helps maintain their delightful chewy texture.
- Fridge: For longer freshness, store them in the refrigerator for up to 2 weeks. Just be sure to seal them well to prevent drying out.
- Freezer: You can freeze Butterfinger Caramel Bars for up to 3 months. Wrap each bar individually in plastic wrap and place them in a freezer bag to avoid freezer burn.
- Reheating: If you prefer them warm, simply microwave for 10-15 seconds. Enjoy that gooey caramel goodness all over again!
Butterfinger Caramel Bars Customizations
Get ready to make these delightful bars your own with simple swaps and creative twists!
- Nut-Free: Replace peanut butter with sunbutter for a nut-free version that’s just as creamy and delicious. Your friends with allergies will thank you!
- Gluten-Free: Use gluten-free graham crackers instead of regular ones for a scrumptious, celiac-friendly dessert. Everyone can enjoy the sweet, buttery crunch!
- Chocolate Drizzle: Top your bars with melted dark or white chocolate for an extra layer of indulgence. It brings a beautiful sheen and an irresistible richness.
- Spicy Kick: Add a pinch of cayenne pepper to the caramel for a surprising heat that complements the sweetness perfectly. It’s a bold twist that will have your guests guessing!
- Oatmeal Crunch: Mix in some rolled oats to the crust for added texture and heartiness. The chewy oats provide a delightful contrast to the smooth caramel.
- Peanut Butter Swirl: Marbling extra peanut butter on top before baking creates a creamy finish that’s bursting with flavor. It’s like adding another layer of love!
- Dairy-Free: Substitute coconut oil for butter and use dairy-free chocolate chips to make this treat vegan-friendly without sacrificing taste. Your plant-based friends will adore them!
- Fruit Fusion: Incorporate dried fruits like cranberries or cherries into the bars for a fruity twist that balances the richness of the caramel. Each bite becomes a delightful surprise!
Make Ahead Options
Preparing Butterfinger Caramel Bars in advance is not only a time-saver but also ensures you have a delicious treat ready for any occasion. You can make the crust and filling separately, storing them in airtight containers in the refrigerator for up to 3 days. To do this, first, bake the crust and allow it to cool completely before wrapping it tightly. For the caramel layer, cook and cool it as well, then transfer it to an airtight container. When you’re ready to finish the recipe, simply spread the caramel over the crust, top with crushed Butterfinger candies, and let it set. This prep method helps maintain the bars’ texture and flavor while making your baking experience smoother!
Butterfinger Caramel Bars Recipe FAQs
What type of butter should I use for Butterfinger Caramel Bars?
For the best flavor and texture, use unsalted butter. This allows you to control the saltiness of your dessert. Make sure it’s at room temperature for easy mixing, which helps create that perfect, gooey caramel layer.
How should I store my Butterfinger Caramel Bars?
Store your Butterfinger Caramel Bars in an airtight container at room temperature for up to 4 days. If you want to keep them fresh longer, refrigerate them for up to a week. Just be sure to let them come back to room temperature before serving so that they retain their delightful gooeyness!
Can I freeze Butterfinger Caramel Bars?
Absolutely! To freeze your Butterfinger Caramel Bars, wrap them tightly in plastic wrap and then place them in a freezer-safe container. They can last up to 3 months in the freezer. When you’re ready to enjoy them, just thaw them in the fridge overnight or leave them at room temperature for a couple of hours.
What should I do if my caramel is too hard?
If your caramel turns out too hard, it could be due to overcooking. To remedy this, gently reheat the bars in the oven at 250°F (120°C) for about 10-15 minutes until the caramel softens. Alternatively, you can drizzle some warm cream over the bars and let it soak into the caramel.
Are there any dietary alternatives for this recipe?
Yes! If you’re looking for gluten-free options, simply substitute regular flour with a gluten-free blend. For a dairy-free version, use coconut oil or vegan butter instead of regular butter and dairy-free chocolate chips in place of milk chocolate. These swaps will still yield deliciously satisfying results!
Can I add other toppings or mix-ins to my Butterfinger Caramel Bars?
Absolutely! Feel free to get creative by adding chopped nuts like pecans or walnuts for added crunch or even a sprinkle of sea salt on top for that sweet-salty combo. You could also mix in some mini marshmallows or drizzle with white chocolate for an extra layer of flavor and texture!
Butterfinger Caramel Bars
Ingredients
Method
- Preheat the oven to 350°F (175°C). Grease the baking pan.
- In a mixing bowl, combine melted butter, brown sugar, flour, oats, baking soda, and vanilla extract. Mix until well combined.
- Press the mixture evenly into the bottom of the prepared baking pan.
- Bake for 10-12 minutes or until lightly golden. Remove from oven and let cool slightly.
- In a saucepan over low heat, combine the unwrapped caramel candies and heavy cream. Stir until melted and smooth.
- Pour the caramel mixture over the baked base and spread evenly.
- Sprinkle the chopped Butterfinger bars evenly over the caramel layer.
- Melt the milk chocolate chips in the microwave or over a double boiler, then drizzle over the Butterfinger layer.
- Let cool completely before cutting into bars.